How to Can Fruit in Syrup or Juice
Learn how to can fruit safely at home using water-bath canning. Covers syrup types, hot pack vs. raw pack, and step-by-step instructions for beginners.
Canning fruit is one of the most forgiving ways to start home preserving. Fruit is high in acid, which means it's safe for water-bath canning without additional acidification in most cases. Whether you're working through a bumper crop of peaches or just want a jar of cherries on the shelf in January, the process is the same: pack the fruit into sterilized jars, cover it with syrup or juice, and process the jars in boiling water for a tested amount of time.
This guide walks through the core method so you understand what you're doing at each step. For exact processing times, always follow a tested recipe from the USDA Complete Guide to Home Canning or the National Center for Home Food Preservation (NCHFP).
Why Fruit Works for Water-Bath Canning
The water-bath method is safe for high-acid foods because the acidity prevents botulism growth. Most fruits fall into this category naturally, including peaches, pears, apricots, plums, berries, and cherries. Low-acid foods like green beans or beets require pressure canning and cannot be safely processed in a boiling-water bath. Fruit gets a pass because the pH is already low enough to inhibit the harmful bacteria that cause foodborne illness.
That said, "it's fruit" is not a substitute for a tested recipe. Processing times vary by fruit type, jar size, altitude, and whether you're using a raw pack or hot pack. Always look up the specific times for what you're making.
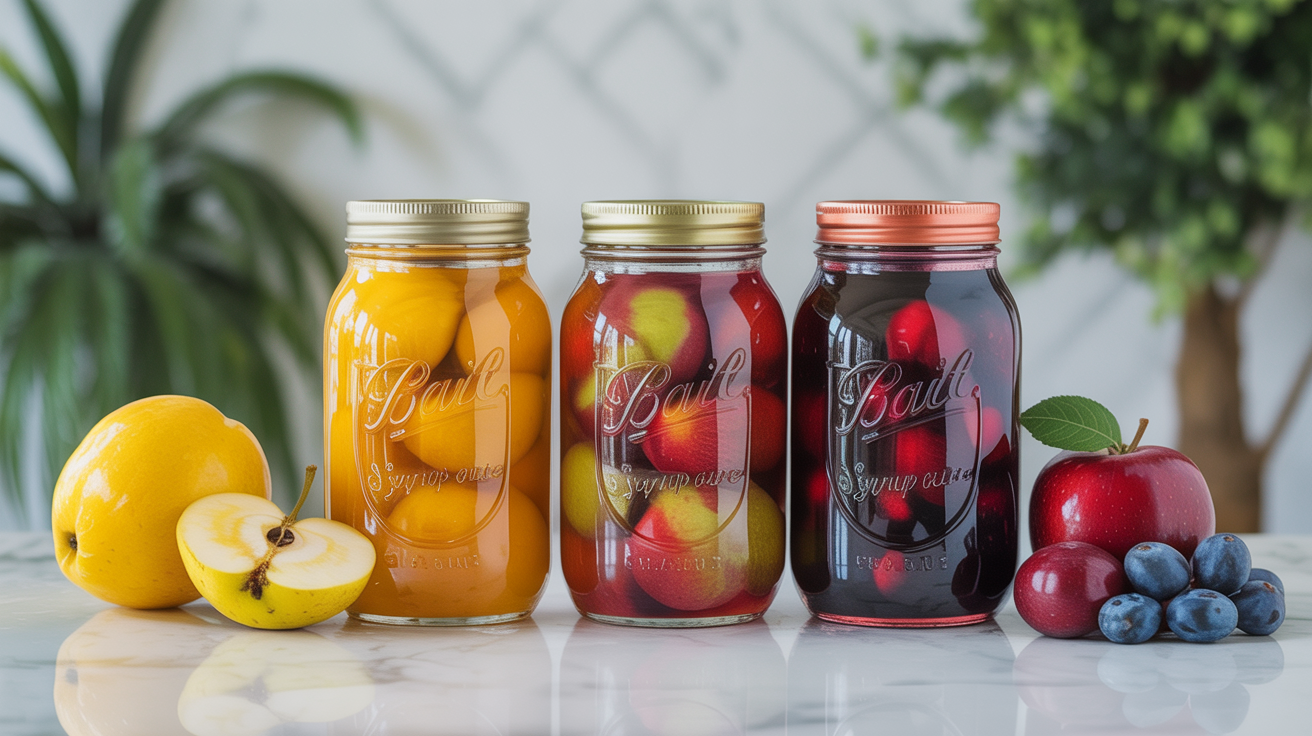
Choosing a Packing Liquid: Syrup, Juice, or Water
The liquid you use affects the flavor and texture of the finished fruit, but not the safety. All three options are acceptable for most fruits.
Sugar syrup is traditional and helps fruit hold its color and shape. Syrup is classified by sweetness:
| Syrup Type | Sugar per 4 cups water | Notes |
|---|---|---|
| Very light | ¾ cup | Closest to natural fruit flavor |
| Light | 1½ cups | Good for mild fruits like pears |
| Medium | 2¼ cups | Classic choice for peaches and apricots |
| Heavy | 3¼ cups | Use for very tart fruits |
| Very heavy | 4¼ cups | Rarely needed for home canning |
A light syrup for canning fruit is a reliable default for most stone fruits. It adds just enough sweetness to balance the fruit's natural tartness without masking the flavor.
Juice works well as a no-added-sugar option. Unsweetened apple juice or white grape juice pairs with most fruits without competing with the flavor. Use commercially bottled juice rather than fresh-squeezed to keep the acidity consistent.
Water is the most neutral choice and produces a less sweet result. Some people prefer it for cooking purposes, since the fruit can go directly into recipes without extra sugar.
Hot Pack vs. Raw Pack
Before you put fruit in the jar, you choose how to pack it.
Raw Pack
Raw pack means placing fresh, unheated fruit directly into the jar, then covering it with hot syrup or juice. It's faster and requires less prep. The tradeoff is that raw fruit tends to float in the jar after processing, and the texture can be softer than hot-packed fruit.
Hot Pack
Hot pack means briefly simmering the fruit in syrup or water before ladling it into jars. This drives out some of the air in the fruit, which reduces floating and helps the fruit hold its shape. Most canning authorities recommend hot pack when the option exists, because the jars process more evenly and the fruit tends to look better on the shelf.
For canning peaches specifically, a hot pack in light or medium syrup is a common approach that produces consistent results.
Step-by-Step: Canning Fruit at Home
This is the general method. Follow a specific tested recipe for your fruit type, jar size, and altitude before you start.
1. Prepare the Fruit
Wash and sort the fruit. Remove pits, cores, or stems as needed. For peaches, score an X on the bottom of each fruit and blanch in boiling water for 30 to 60 seconds, then transfer to ice water. The skins slip off easily.
Cut fruit into halves or quarters for easier packing. Work in batches to prevent browning. A solution of water and ascorbic acid (vitamin C) keeps cut fruit from discoloring while you work.
2. Make the Syrup or Prepare the Juice
Combine sugar and water in a saucepan and heat until the sugar dissolves. Keep it warm but not boiling while you pack the jars.
3. Fill and Process the Jars
See the full water-bath method walkthrough for detailed setup steps. In brief:
- Fill your canner with water and bring it to a simmer.
- Inspect jars for chips or cracks.
- Pack the fruit into hot jars, cavity-side down for halves.
- Ladle hot syrup over the fruit, leaving ½ inch of headspace.
- Remove air bubbles by running a thin spatula around the inside edge of the jar.
- Wipe the jar rim, apply the lid and band fingertip-tight.
- Lower jars into the canner and process for the time specified in your tested recipe.
Altitude matters. Processing times are calibrated for sea level. If you live above 1,000 feet, you'll need to adjust. The NCHFP website includes altitude adjustment tables.
4. Cool and Check the Seals
Remove jars and place them on a towel at least one inch apart. Let them cool undisturbed for 12 to 24 hours. You'll hear the lids pop as they seal.
After cooling, press the center of each lid. A properly sealed lid does not flex up and down. Remove the bands, check the seals, and refrigerate any jars that did not seal. Eat those first.
How to Know if a Jar Is Safe to Eat
Before opening a jar, check for visible signs of spoilage: bulging lid, spurting liquid, unusual odor, or mold. If anything looks or smells off, discard the jar without tasting the contents. When in doubt, throw it out. That's not overcaution; it's standard safe canning practice.
Properly sealed and processed jars of fruit stored in a cool, dark place are generally best used within one to two years, though they remain safe beyond that if the seal holds. Flavor and texture decline over time.
For a broader look at what fruits and other foods are safe for this method, see what foods can you water-bath can.
Frequently Asked Questions
Do I need to add lemon juice when canning fruit?
Most fruits are acidic enough on their own and don't require added lemon juice. Exceptions exist. Some newer varieties of tomatoes, for example, have lower acid content and do require added acid. Always check your recipe. For standard fruits like peaches, plums, pears, and berries, a tested recipe will specify whether lemon juice is needed.
Can I use honey or artificial sweeteners instead of sugar?
Honey can replace sugar in syrup, though it changes the flavor and darkens over time. Some tested recipes are written specifically for honey and are the safest option. Artificial sweeteners are generally not recommended for syrup in canning because they don't behave the same way under heat. Some canners add a small amount after opening rather than during processing.
Why is my fruit floating to the top of the jar?
Floating is common with raw-packed fruit because air trapped in the fruit's cells pushes it upward during processing. It's not a safety problem, just cosmetic. Switching to a hot pack method reduces floating significantly because simmering the fruit drives out that air before it goes into the jar.
How long do home-canned fruits last?
The USDA recommends using home-canned fruit within one to two years for best quality. The jars are generally safe beyond that if the seal is intact, the lid has no rust or corrosion, and the contents look and smell normal. Quality degrades over time, so earlier is better.
What's the difference between canning peaches and canning other stone fruits?
The water-bath process is similar for most stone fruits. Peaches are typically blanched to remove skins, while plums and cherries can be canned with skins on. Pit cherries before canning. For apricots, skin removal is optional. Always look up the specific tested recipe for your fruit rather than assuming times are interchangeable across stone fruits.