How to Water-Bath Can: A Step-by-Step Guide for Beginners
Learn how to water-bath can safely with this beginner-friendly guide covering equipment, the full canning process, altitude adjustment, and seal checks.
Water-bath canning is one of the most accessible ways to preserve food at home. A pot, a rack, some jars, and a tested recipe are all you really need to put up shelf-stable jam, pickles, or fruit that will last through the winter. This guide walks you through every step of the boiling water canning method so you know what to do, in what order, and why it matters.
Before diving in: water-bath canning is safe only for high-acid foods (fruits, jams, jellies, properly acidified tomatoes, and pickles). Low-acid vegetables, meats, and most soups must be processed in a pressure canner. Using the wrong method for the wrong food can cause serious illness, including botulism. If you are not sure whether your recipe is suited to water-bath canning, check with the USDA Complete Guide to Home Canning, the National Center for Home Food Preservation (NCHFP), or Ball's Blue Book before you start.
What You Need Before You Start
Good equipment and a tested recipe are the foundation of safe home canning. Improvising either one is where beginners run into trouble.
Equipment checklist
- A large, deep pot with a lid (at minimum 3 inches deeper than your tallest jar)
- A canning rack or a folded kitchen towel to keep jars off the pot bottom
- Mason-style canning jars in good condition, with no chips, cracks, or scratches on the rim
- New two-piece lids (flat lid plus screw band); reusing old flat lids is the top cause of failed seals
- Jar lifter, wide-mouth funnel, bubble remover or thin spatula, clean cloths or paper towels
- A timer you can trust
Choosing a tested recipe
A tested recipe is one developed and validated by a food-safety authority: the USDA, NCHFP, or Ball. These recipes specify exact ingredients, proportions, and processing times that have been confirmed in a lab to produce a final product at a safe pH. Substituting ingredients (swapping out sugar, changing the pepper-to-vinegar ratio in a pickle brine) can alter acidity and turn a safe recipe into an unsafe one.
If you are new to water-bath canning, pick one recipe, follow it exactly, and resist the urge to adjust. Once you understand how the method works, you will have a much better sense of what is and is not safe to modify.
Preparing Jars and Keeping Them Hot
Pouring hot food into a cold jar causes thermal shock, which can crack the glass and ruin the seal. The fix is simple: keep your jars hot until the moment you fill them.
Washing and inspecting jars
Wash jars in hot, soapy water, or run them through the dishwasher. While they are still wet, run your finger around the rim of each one. Any chip or roughness that you can feel means air bubbles will hide there and prevent a proper seal. Set those jars aside for dry storage, not canning.
Keeping jars hot
Fill your canning pot halfway with water, lower in the clean jars, and bring the water to a gentle simmer (around 180°F). Leave the jars in the simmering water until you are ready to fill them. Pull them out one at a time rather than all at once; this keeps them at temperature and ensures they go from hot water to hot food without a dangerous temperature swing.
Filling Jars Correctly
Filling is where most beginners make small errors that snowball into sealing problems. Take your time here.
Headspace matters
Headspace is the empty space between the top of the food (or liquid) and the rim of the jar. Your tested recipe will specify an exact amount, commonly 1/4 inch for jams and jellies, and 1/2 inch for fruits, tomatoes, and most pickles. Too little headspace and the expanding food during processing will push up under the lid and break the seal. Too much headspace and the jar may not seal either, because the partial vacuum that forms during cooling depends on the right amount of air being present.
A wide-mouth funnel makes hitting the right headspace much easier.
Removing air bubbles
After filling, run a bubble remover or thin spatula around the inside edge of the jar, between the food and the glass. Air pockets hiding in the jar will push the food up as they heat, throwing off your headspace measurement. Do this step even when the jar looks bubble-free; you will almost always dislodge at least one.
After removing bubbles, check your headspace again and adjust if needed.
Wiping the rim
Wipe the jar rim with a clean, damp cloth or folded paper towel. Any food residue, especially anything with fat or pectin, will prevent the lid from sealing properly. One swipe usually does it, but go around twice if the rim looks sticky.
Applying Lids and Loading the Canner
Lid placement and "fingertip tight"
Center the flat lid on the jar. Then screw on the band until you feel resistance, and stop. This is fingertip tight: snug, but not so tight that you're straining. Over-tightening prevents air from escaping during processing, which is exactly what needs to happen for the vacuum seal to form. Trust the phrase and resist the urge to really crank it down.
Loading jars into the canner
Lower each filled jar onto the rack using a jar lifter. Keep jars upright at all times; tipping them sideways mixes the food into the headspace. Add more hot water if needed so the jars are covered by 1 to 2 inches of water above the lids. Too little water means some jars may be exposed as the water boils off; too much and the boiling action can jostle lids loose.
Put the lid on the pot.
The Processing Step (Where the Actual Preserving Happens)
This is the step most beginners rush or misunderstand. Getting it right is the whole point of water-bath canning.
Bringing water to a full rolling boil
Turn the heat to high. You are waiting for a full rolling boil — water churning hard, not just steaming or showing a few lazy bubbles. Once the water reaches that point, start your timer. Not when you turned on the burner, not when the first bubbles appeared. The timer starts when the water is at a full boil.
Process for the time your tested recipe specifies. If you open the lid to check something and the boil drops significantly, bring it back to a full boil before resuming timing.
Why altitude matters and how to adjust
Water boils at a lower temperature at higher elevations, which means the food inside the jars does not get as hot as it would at sea level. Lower processing temperature means pathogens may survive. To compensate, tested recipes include altitude adjustment tables that add time to the processing step.
If you live above 1,000 feet in elevation, you must adjust your processing times. Your tested recipe will have a table showing how many minutes to add based on your elevation. For detailed guidance on finding your elevation and applying the right correction, see our guide at /posts/how-to-adjust-canning-for-your-altitude.
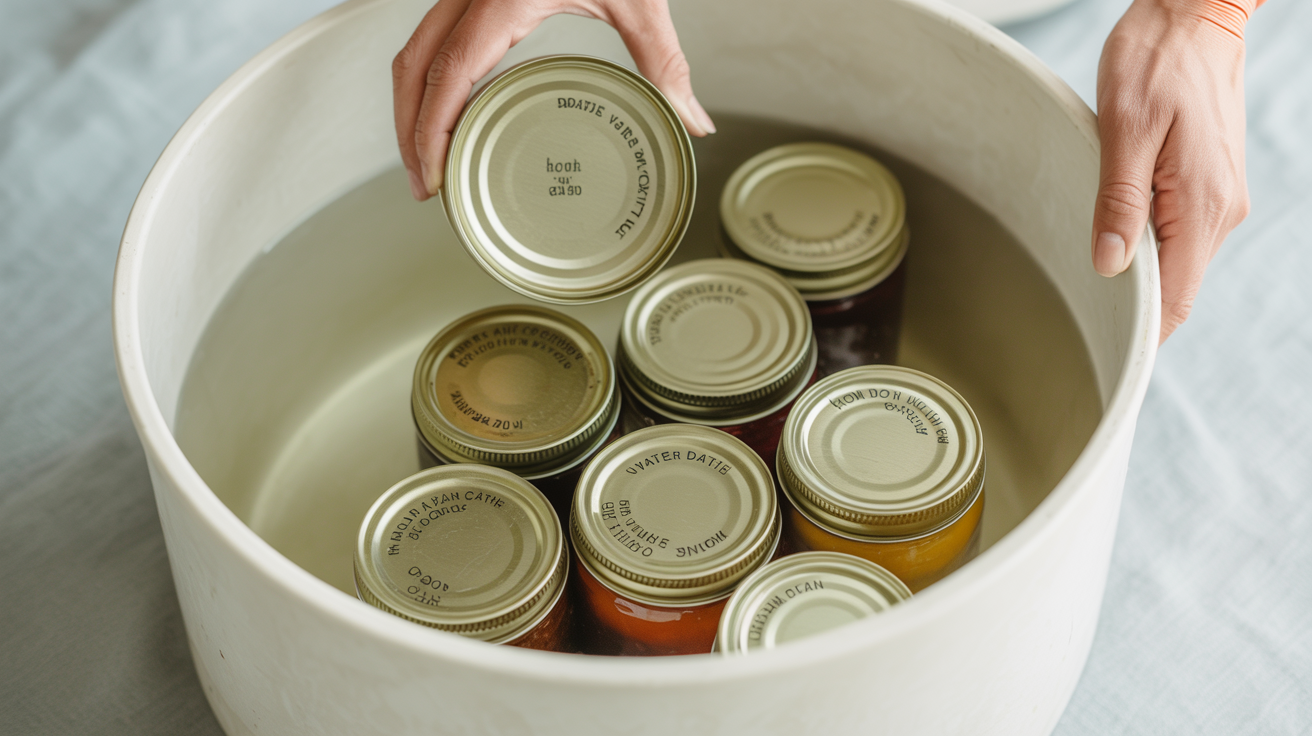
Cooling, Checking Seals, and Storing
Removing jars and the 5-minute wait
When the processing time is up, turn off the heat, remove the canner lid, and let the jars sit in the water for 5 minutes. This brief rest lets the boiling inside the jars settle down before you move them, which reduces siphoning (food bubbling out under the lid).
Use a jar lifter to move jars straight up and onto a folded towel or cooling rack. Keep them upright, and leave at least an inch of space between jars so air can circulate. Do not tilt, press on the lids, or cover the jars.
Cooling undisturbed
Leave the jars completely alone for 12 to 24 hours. You will likely hear the satisfying "ping" of lids sealing as the jars cool. That sound is the center of the lid being pulled down by the vacuum forming inside. Resist the urge to press on lids while the jars are still warm; you can artificially depress a lid that has not actually sealed, which gives you a false result.
Checking seals
After 12 to 24 hours, remove the screw bands and check each lid:
- Press the center of the lid. It should be firm and slightly concave, with no flex.
- Tap the lid with a spoon. A sealed lid gives a clear, high-pitched ring. A dull thud means the jar did not seal.
- Check visually: the center of a sealed lid curves down slightly.
Any jar that failed to seal should go into the refrigerator and be used within a few days, or be reprocessed with a new lid within 24 hours. Do not store unsealed jars on a shelf.
Labeling and storage
Before storing, remove the screw bands. A properly sealed lid holds itself in place just fine, and leaving bands on traps moisture that causes rust. Write the contents and date on the lid with a marker or use a label. Store in a cool, dark place away from direct sunlight and temperature swings. Most properly canned, high-acid products are best within 12 to 18 months, though they remain safe beyond that if the seal is intact and the lid shows no signs of damage.
Choosing What to Can First
Water-bath canning works for high-acid foods only. Jams, jellies, marmalade, fruit preserves, pickles, chutneys, and properly acidified tomatoes all fall within safe territory. Tomatoes sit close to the pH boundary, which is why tested tomato recipes always include added acid (bottled lemon juice or citric acid) to ensure safety. You can read more about that requirement at /posts/how-to-can-tomatoes-safely-and-why-you-add-acid.
For a broader overview of which fruits and vegetables are appropriate for water-bath canning and which require pressure canning, see /posts/what-foods-can-you-water-bath-can.
FAQ
Can I use any large pot for water-bath canning?
Yes, as long as it is deep enough. The pot needs to hold your jars on a rack with 1 to 2 inches of water covering the lids and at least an inch or two of clearance above the water line for vigorous boiling. Purpose-made canners come with a fitted rack, but a large stockpot and a folded dish towel or a round cooling rack placed on the bottom work fine for beginners.
Do I need to sterilize jars before canning?
For most water-bath canning recipes with a processing time of 10 minutes or more, keeping jars hot in simmering water is sufficient. The processing step itself sanitizes the jar. Recipes with very short processing times (under 10 minutes) may require pre-sterilization; your tested recipe will specify this. Always follow what the recipe says.
Why do I start timing when the water reaches a full boil, not when I turn on the heat?
The processing time in a tested recipe is calibrated to a specific temperature: the temperature of a full boil at sea level (212°F). The food inside the jars reaches safe temperature only once the surrounding water is genuinely boiling hard. Starting the timer early, when the water is merely hot, gives the food inside less actual heat treatment than the recipe intends.
My lid sealed but the center looks very sunken. Is that a problem?
A slightly concave (curved-down) center is exactly what you want. That is the vacuum pulling the lid down. If the center is deeply dented or the lid looks buckled, inspect the jar carefully for any off odors or unusual appearance before using. When in doubt, discard it.
Can I reuse screw bands but not flat lids?
Correct. Screw bands can be reused as long as they are clean and free of rust or dents. Flat lids should always be new for each canning batch. The sealing compound on the underside of the flat lid is designed to form a one-time bond with the jar rim; using a previously used flat lid is one of the most common reasons new canners end up with failed seals.